
As long as we’ve been in our house my wife has needed a proper solution for storing her various craft supplies. Over the years we moved some plastic drawers and spare shelves into the room but they didn’t work well for her purposes. Though many of the containers would hold most of her items they were difficult to keep organized and simply weren’t made for this purpose.
Early this month she decided to purchase The Workbox, which is made by a company named The Original ScrapBox. At first glance some may hesitate on purchasing one because of the cost (around $1,600) but, after seeing it in use, I think my wife made a good choice with this purchase. Note that the above photo of the Workbox does not show the included shelving and storage.
This post isn’t going to cover the full details of assembly or a personal review of The Workbox (afterall, this is my wife’s purchase and not mine). Instead, I just wanted to mention a handful of items that some may consider stumbling blocks or that may not be immediately obvious.
How long does it take to assemble? Well, I don’t know exactly because we took our time and didn’t do it all in one day. Though I spent more time on assembling the overall structure it required a considerable amount of additional time for my wife to add the smaller shelves and the fabric containers. Minimally, I would expect this to take at least four to six hours but that’s highly variable and can easily take longer.
Few tools were required. We used a powered screwdriver (Phillips tip and flat tip), a single nut driver, and a hammer. The hammer was used the least and only to hammer in bolts used to connect the wheels.
RB Assembly
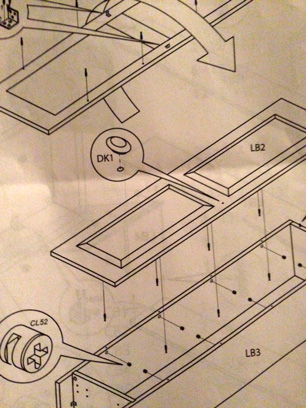
The instructions include a full page showing how to assemble the LB component. However, there are times when it’s clear that the instructions make some assumptions. For example, ours did not include a page for the RB section that show the same (somewhat opposite) instructions as it does for LB. Basically, it’s assumed that you’ll understand this so don’t bother flipping the pages expecting to find this. It probably won’t be a difficult task for most as there are guides and obvious spots to use for orientation and completion.
Shelf Support Screws


This series of tasks is the only part where accuracy is extremely critical. If the screws aren’t aligned with the bottom of edge of the shelf supports then one may have a screw come through the side of the wood or the supports may end up slightly out of alignment, causing problems with the shelves later on. Take these very slow.
When I was working on this part I would drive the screws until they just barely showed through the holes but not so far that I couldn’t slide the supports over them. Then I visually inspected each one to make sure it was aligned before screwing it into the shelf supports. In some cases a spacer board was available and instead of placing it at the top (where wooden pegs already provide proper alignment) I used it at the bottom to help align the screw holes.
Cable Management Hole
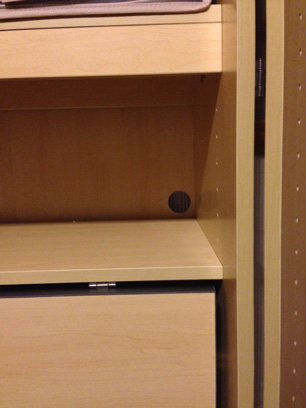
Our instructions did not show where the hole for cabling should be located and I wasn’t able to determine any such recommendation by viewing photos on the Web. In the end I oriented that back board in a way that placed the hole on the right side of the shelf above the desk. I believe the boards can be swapped and reversed so it’s in the opposite position (left side) if desired. Make sure the orientation is correct or you could end up with the hole far up toward the top of the cabinet in a much less useful position.
Shelving Support
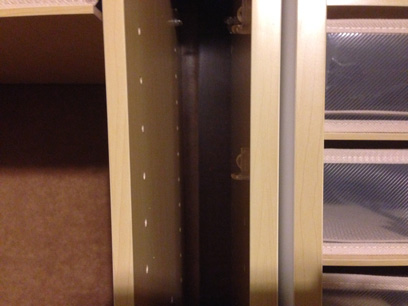
Before you get too eager at this point and start inserting shelves I first recommend that you begin with the smaller shelves that go into the narrower areas. Overall, the Workbox is very sturdy but the supports for the shelves do not, themselves, have any significant support toward the middle. As a result, the smaller shelves will add additional support and help even out any bow toward the middle that may occur.
If you first add the larger shelves you may find them not fitting yet and dropping out of place.
Top Locks
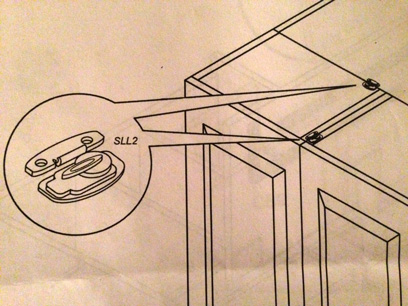
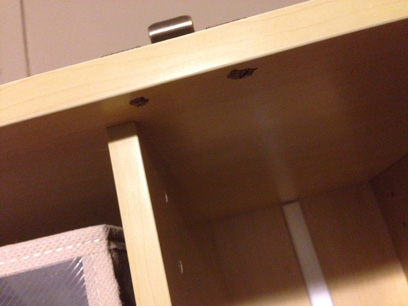
The Workbox has a couple of locks installed at the top that are only intended to keep the doors from swinging open if the unit is moved. The instructions appeared to show the use of the same screws for all of the locks but from first-hand experience I can not recommend this. The problem is that two of the screws will be too long and punch through the top of the cabinet. Instead, use two shorter screws (you’ll have plenty of these type left over) for those holes (shown in the photo above) or perhaps even for all of them.
These are the only issues that I can think of and none of them were show stoppers. Only one lead to a visible problem and the rest just took a moment to think about. If you take your time and line things up as best as possible then everything should come together just fine.
I can state with certainty that my wife is very, very happy with this purchase and she has already consolidated items from at least nine different storage containers into the Workbox.


Leave a comment